Showing posts with label Gradle. Show all posts

Wednesday, July 22, 2015

MyNotes: Unit Test Round 2


Recently, Android updated the unit test framework to include Junit4 and mockito.  The testing framework now comes in two flavors: Local Tests and Instrumentation Tests.  The local tests are true units that do not run on an emulator or device.   As a result, everything has to mocked.   The instrumentation tests are pretty much the same as the earlier tests: They require an emulator or device and run the full android system.  

Android provides a handy write up on the Android Developers site: Building Local Unit Tests

I followed their instructions fairly closely with the big deviation that I brought in PowerMockito as well.

I followed the same pattern in both the MyNotes and CommonLibrary projects.  For simplicity, I am only going to detail the changes to one of the projects.

Step 1: Update Gradle

Here are the changes I had to make in order for the new unit test framework to work:


android {
...

defaultConfig {
...
testInstrumentationRunner "android.support.test.runner.AndroidJUnitRunner"
}
...
}


dependencies {
...
//Unit test dependencies
testCompile 'junit:junit:4.12'
testCompile 'org.mockito:mockito-core:1.10.19'
testCompile 'org.powermock:powermock-module-junit4:1.6.2'
testCompile 'org.powermock:powermock-api-mockito:1.6.2'

androidTestCompile 'org.hamcrest:hamcrest-library:1.1'
androidTestCompile 'com.android.support.test:runner:0.3'
androidTestCompile 'com.android.support.test:rules:0.3'
androidTestCompile 'com.android.support.test.espresso:espresso-core:2.2'
androidTestCompile "com.google.dexmaker:dexmaker:1.2"
androidTestCompile "com.google.dexmaker:dexmaker-mockito:1.2"
}


Step 2: Create The Local Unit Test Packages


So the instrumentation tests (those that require an emulator) are in the androidTest folder that is a sister to the main folder.  The local unit tests get their own folder, test, at the same level as the main folder also:


Untitled


The “test” folder must contain a folder named “java”.  Under the java folder is the basic package layout for the classes that will be tested.


Step 3: Creating a Local Unit Test


@RunWith(PowerMockRunner.class)
@PrepareForTest({LocalBroadcastManager.class, ThreadUtils.class, MyNotesApplication.class, Intent.class,
NoteFilterBroadcast.class})
public class NoteFilterCacheTest {

@Mock
private Context mMockContext;

@Mock
private SharedPreferences mMockSharedPreferences;

@Mock
private SharedPreferences.Editor mMockSharedEditorPreferences;

@Mock
private LocalBroadcastManager mMockLocalBroadcastManager;

@Mock
private Intent mMockIntent;

@Before
public void prepareForTest() throws Exception {
when(mMockContext.getSharedPreferences(NoteFilterCache.CACHE_NAME, Context.MODE_PRIVATE))
.thenReturn(mMockSharedPreferences);

PowerMockito.mockStatic(LocalBroadcastManager.class);
when(LocalBroadcastManager.getInstance(mMockContext)).thenReturn(mMockLocalBroadcastManager);

when(mMockSharedPreferences.edit()).thenReturn(mMockSharedEditorPreferences);
when(mMockSharedEditorPreferences.clear()).thenReturn(mMockSharedEditorPreferences);
doNothing().when(mMockSharedEditorPreferences).apply();
when(mMockSharedEditorPreferences.putBoolean(anyString(), anyBoolean())).thenReturn(mMockSharedEditorPreferences);

PowerMockito.whenNew(Intent.class).withAnyArguments().thenReturn(mMockIntent);
}

/**
* Test constructor
*/
@Test
public void testConstructorFailure() {
try {
new NoteFilterCache(null);
assert false;
}
catch (NullPointerException e) {
}
}


/**
* Tests method {@link NoteFilterCache#isColorEnabled(NoteColor)} and
* method {@link NoteFilterCache#getEnabledColors()}
*/
@Test
public void testRetrievingTheDefaultValuesForEachFilter() {
NoteFilterCache cache = new NoteFilterCache(mMockContext);

when(mMockSharedPreferences.getBoolean(anyString(), eq(true))).thenReturn(true);
Set < NoteColor > actualEnabledColors = cache.getEnabledColors();
for (NoteColor color : NoteColor.values()) {
assertThat(cache.isColorEnabled(color), is(true));
assertThat(actualEnabledColors.contains(color), is(true));
}
}


/**
* Tests method {@link NoteFilterCache#isColorEnabled(NoteColor)}
*/
@Test
public void testCheckingEnabledColorForNullValue() {
try {
new NoteFilterCache(mMockContext).isColorEnabled(null);
assert false;
}
catch (NullPointerException e) {
}
}


/**
* Tests method {@link NoteFilterCache#enableColor(NoteColor,
* boolean)}.
*/
@Test
public void testDisablingEachColor() {
final NoteFilterCache cache = new NoteFilterCache(mMockContext);

when(mMockIntent.putExtra(eq(NoteFilterBroadcast.Extras.COLOR), anyInt())).thenReturn(
mMockIntent);
when(mMockIntent.putExtra(NoteFilterBroadcast.Extras.ENABLED, false)).thenReturn(
mMockIntent);

for (final NoteColor color : NoteColor.values()) {
cache.enableColor(color, false);
}

verify(mMockSharedEditorPreferences, times(NoteColor.values().length)).putBoolean(
anyString(), eq(false));
verify(mMockLocalBroadcastManager, times(NoteColor.values().length)).sendBroadcast((Intent) anyObject());
}


/**
* Tests method {@link NoteFilterCache#enableColor(NoteColor,
* boolean)}.
*/
public void testEnablingEachColor() {
final NoteFilterCache cache = new NoteFilterCache(mMockContext);

for (final NoteColor color : NoteColor.values()) {
cache.enableColor(color, true);
verify(mMockSharedEditorPreferences.putBoolean(color.name(), true));
}

verify(mMockLocalBroadcastManager, times(NoteColor.values().length)).sendBroadcast((Intent) anyObject());
}
}

This is your basic Junit 4 test.  The important thing to remember is that you have to mock all Android classes that are called from the unit under test.  For most part, this will go smoothly, but there are a few classes that just do not mock well (Point, Rect, etc).  This is because the classes use final public attributes instead of accessor methods which make them incredibly hard to mock.  Also be warned, that you will have to mock everything from the framework, this includes things some very basic and commonly used classes like TextUtils.  Android does provide a way to use default mock values, but I typically don’t use it. If you are interested, just add the following statement to your gradle file:


android {
// ...
testOptions {
unitTests.returnDefaultValues = true
}
}

The local unit tests work really well for most of the business logic in the app.  It does not work well for UI components, the Database, Loaders, Broadcast Receivers, etc.  Basically, anything that is highly dependent on an actual Android framework. 


Step 4: How to run


  • Open the Build Variants tool in the Android Studio (located in the lower left corner:

Untitled


  • From the Test Artifacts menu, select Unit Tests
  • Navigate to a unit test and do a right-click:

Untitled


  • Select the Run or Debug option of your choice.
  • After the tests run, the results are displayed in the junit results:

Untitled


Instrumentation Tests


These are very similar to the old instrumentation tests.  The biggest change is that they are now JUnit4 (Yeah!) and also support Mockito.  It will support PowerMockito as well, but you can’t mock any statics (unfortunately).   You also have to add a Test Runner to the top of each test:


/**
* Test the {@link Note class}.
*/
@RunWith(AndroidJUnit4.class)
public class NoteContentValuesTest {

Running these is very similar to the local unit test, except you choose the “Android Instrumentation Tests”  in the Build Variant menu:


Untitled


My Final Note


This is more of an FYI.  The Test Artifact selected in the Build Variant are the only ones that will compile and run.  So if you are working on Local Unit Tests, make sure to select the correct build variant first so that you can see the syntax issues while you writing the tests.  The same goes for the Instrumentation Tests.


It is also important to compile each variant before considering the task complete since compilation issue won’t show up for the unselected variant.


Commits


As always, the commits to support this entry can be found on GitHub at https://github.com/fsk-software/mynotes/commit/ef1dd5389c7783deb05cbacf43c5e5f5628398f6.

Wednesday, May 13, 2015

MyNotes : Logging Made Easier

Before I proceed much further I want to bring in a logging framework.  I am going to use Hugo.  It provides everything I want for the trace logging and it does it with a single annotation which is very nice.  I included my steps to incorporate below, but I really just followed the setup instructions provided on the website.

MyNotesProject build.gradle file:


dependencies {
...
classpath 'com.jakewharton.hugo:hugo-plugin:1.2.1'
}

And then I add the following line into the MyNotes and Common Library module build.gradle file:


apply plugin: 'com.jakewharton.hugo'

To trace log a method I just have to add the following annotation to the method: @DebugLog.


Example


If I add the annotation to the MainActivity onCreate method:


@Override
@DebugLog
public Loader<List<Note>> onCreateLoader(final int id, final Bundle args) {
return new FilteredNoteLoader(this);
}

Then I automatically get the following log entry in my logcat:


com.fsk.mynotes I/art﹕ Not late-enabling -Xcheck:jni (already on)
com.fsk.mynotes V/MainActivity﹕ ⇢ onCreateLoader(id=0, args=null)
com.fsk.mynotes V/MainActivity﹕ ⇠ onCreateLoader [364ms] = FilteredNoteLoader{389f6776 id=0}

com.fsk.mynotes D/OpenGLRenderer﹕ Render dirty regions requested: true


Commits


The commits for these changes can be found here.

Wednesday, April 1, 2015

MyNotes: Pass the Butter

I recently posted an entry about incorporating Roboguice.  Well, I changed my mind about that and decided to swap it for ButterKnife after all.   After doing some UI work, it became apparent that Roboguice was overkill for MyNotes and wasn't going to work really well in the CommonLibrary.

After some thought, I decided that ButterKnife was a better fit.  Here are the steps I used for swapping out the libraries:

Step 1: Undo the RoboGuice Integration.

I just reversed the steps from the blog entry to return to a clean slate.

Step 2: Bring in ButterKnife

Update the MyNotes gradle.build file with the following:

   release {
     // Library specific proguard files
     ...
     proguardFiles 'proguard-butterknife.pro'
   }
   ....

   dependencies {
      ....  
      compile 'com.jakewharton:butterknife:6.1.0'
    }
Add proguard-butterknife.pro to the project with the following content:
-keep class butterknife.** { *; }
-dontwarn butterknife.internal.**
-keep class **$$ViewInjector { *; }

-keepclasseswithmembernames class * {
    @butterknife.* <fields>;
}

-keepclasseswithmembernames class * {
    @butterknife.* <methods>;
}
Incorporate it into the MainActivity:
    /**
     * UI element to display the note data.
     */
    @InjectView(R.id.activity_main_notes_recycler_view)
    RecyclerView mCardsRecyclerView;


    /**
     * UI element to allow a user to create a new note.
     */
    @InjectView(R.id.activity_main_add_view)
    View mAddView;


    /**
     * The adapter to manage the display of cards in {@link #mCardsRecyclerView}.
     */
    CardAdapter mCardAdapter;


    @Override
    protected void onCreate(final Bundle savedInstanceState) {
        super.onCreate(savedInstanceState);
        setContentView(R.layout.activity_main);
        ButterKnife.inject(this);

Commits:

Wednesday, February 25, 2015

MyNotes: Fruit Based Libraries

As you might have noted from the last commits, I brought in the Guava library.  There are two schools of thought on Guava with Android:  Do it or Avoid at all cost.

I am ambivalent on the subject.

I don't like bringing in large libraries because they push your app towards the dreaded 65k method limit.  Android has provided ways to mitigate the issue, but I don't like getting close to it. Guava is a big library and that has to be take into consideration.

On the other hand, I don't have the time or resources to reinvent the wheel or keep it turning when it comes to the functionality that Guava gives me.

After waffling for awhile, I decided to include Guava.  This means that I will need to use Proguard ot shrink the library to only those classes that I am using.  It also means I have to be more careful in my release testing to make sure the Proguard minimazation works and that I am not including more of Guava than I need.

To bring in Guava with Gradle, you need to add MavenCentral as a valid repository and then add the dependency.  It ends up looking like this:

allprojects {
    repositories {
        jcenter()
        mavenCentral()
    }
}
...

dependencies {
    compile group: 'com.google.guava', name: 'guava', version: '18.0'

   .... other dependencies....
}

I also need to add a new file into the projects called progurard-guave.pro and add that to the release building portion of gradle:
buildTypes {
  release {
    minifyEnabled true

    // Library specific proguard files
    proguardFiles 'proguard-guava.pro'

    //Default proguard file
    proguardFiles getDefaultProguardFile('proguard-android.txt'), 'proguard-rules.pro'
  }
}

Just an FYI:  do not trust the contents of proguard-guava.pro yet.  I am saving the real work on the file for later once the development is done.

Commits

You can find the changes for this entry among the commit at https://github.com/fsk-software/mynotes/commit/a89a3c2d74d7bb5aeff7520a38d417a8ec05a9e3.

Wednesday, January 28, 2015

MyNotes: Updating the Database

I am going to keep my database schema the same.


I don't really like the names of the database, table, or columns.  However, I don't want to change the schema since the app has already been released and the schema will still work for the expected functionality.  It sucks, but that is one of the trade-offs that have to be made sometimes.

The same cannot be said for the code that defines and manages the database.  That is going to get a major overhaul.

Step 1: Updating the Common Library

My first order of business is create some classes in the CommonLibrary to help with future database needs.  The classes are :

  1. CommonTerms - An interface that defines common terms and phrases used to define and create database schemas. Basically, just a constants class.
  2. DatabaseModel - An interface that defines the common methods for defining and setting up a database.  This will let me use the DatabaseHelper for my database management.
  3. DatabaseHelper - A helper class to manage the databases for an app.
These classes are located under the com.fsk.common.database folder.  Take a peek at them when you have a chance to understand what they are.

Step 2: Adding the CommonLibrary Unit Tests

The first step here is to update the manifest to let me build an apk.  The library manifest suffers the same issue the MyNotes manifest has with respect to the duplicate file problem.  That was discussed briefly in the Setting Up the Unit Tests entry.

Basically, I just added the following entry to the Android block in the CommonLibary gradle file:

    //Required to prevent duplicate files during the build due to the imported libraries.
    packagingOptions {
        exclude 'LICENSE.txt'
        exclude 'META-INF/DEPENDENCIES.txt'
        exclude 'META-INF/LICENSE.txt'
        exclude 'META-INF/NOTICE.txt'
        exclude 'META-INF/NOTICE'
        exclude 'META-INF/LICENSE'
        exclude 'META-INF/DEPENDENCIES'
        exclude 'META-INF/notice.txt'
        exclude 'META-INF/license.txt'
        exclude 'META-INF/dependencies.txt'
        exclude 'META-INF/LGPL2.1'
    }

I also added a block to the same gradle file to support java 7:

    compileOptions {
        sourceCompatibility JavaVersion.VERSION_1_7
        targetCompatibility JavaVersion.VERSION_1_7
    }

Next, I created the first unit test for the DatabaseHelper file.  I don't need unit tests for the other two files so we can move onto the MyNotes module changes.

Step 3: Updating the MyNotes Module

These changes all resolve around removing or deprecating the old database code and replacing it with the new database setup.

In the original code, the database setup/management was messy and hard to follow because it was split between three main files: DatabaseKeys, NotesTableManager, and DatabaseManager.  Unfortunately, some of the Database management leaked into other classes, which I am going to deal with in the next entry.

For the new design, I moved the entire database schema into the MyNotesDatabaseModel class (com.fsk.mynotes.data.database).  This class implements the CommonLibrary's Database Interface so that I can just use the DatabaseHelper (or an extension of it) to manage my database setup and access.

The original code also has some issues with the timing and survival of the database.  Unfortunately, I created the database in the Activities which meant that sometimes the database went down and there was a lag between the activity starting and the database being ready.

This time around I want to centralize my database initialization into one area that will guarantee it stays alive for the entire application life cycle.  I also want to be sure it is alive before the first activity creates. Luckily, I can do this by creating a custom Application class : MyNotesApplication.

I have to modify the manifest to tell it to use the MyNotesApplication class instead of the system default one. this is done by adding the following line to the manifest application element :

<application
  android:name=".MyNotesApplication"
  android:label="@string/app_name"
  android:icon="@drawable/my_icon">
...
</application>

In MyNotesApplication, I extended the OnCreate method to create the database and initialize the DatabaseHelper with it.

My last step is to do a little cleanup and preparation for removing the NoteTableManager.  The NoteTableManager is going to be removed soon, but it is too big of task for this entry.  For now, I am just going to deprecate and modify it internally to use the DatabaseHelper.

Commits


That is it for this round of mods.  The commit can be found at https://github.com/fsk-software/mynotes/commit/9e368c82f2b5fc7291e2a48127e35ea1da26c7b5


*Technically, the code will run at this point, but it looks bad and is only semi-functional.  The next few sets of changes will probably render it inoperable for a while.

Wednesday, January 14, 2015

MyNotes: Setting up the Unit Test Framework

The next step is to set up the unit test framework for the project.  

There are a lot options for this but I prefer a very simple setup using only junit, mockito, and hamcrest.  Robolectric is also a great option and will dramatically speed up the tests.  However, I have had issues with it when mocking statics so I tend to stay away from it unless I think the slower speed of  running on an emulator will cause problems.

I start my setup by creating a sister folder to my main folder.  The new folder is named androidTest and will contain all of my unit tests.  Under  the androidTest folder,  I duplicate the same folder structure as my main folder.


Next we have to modify the gradle.build file in the MyNotes modules to add dependencies for the unit tests.

This can be tricky to get working correctly, but the setup that works for me is to add the following lines to the dependencies block:


    //Unit test dependencies
    androidTestCompile group: 'org.hamcrest', name: 'hamcrest-core', version: '1.3'
    androidTestCompile group: 'junit', name: 'junit-dep', version: '4.11'
    androidTestCompile("org.mockito:mockito-core:1.9.+") {
        exclude group: 'org.hamcrest'
    }

This will only include the hamcrest, junit and mockito libraries only when running the unit tests.
The junit and hamcrest inclusion will cause a duplicate file build error due to both libraries including a LICENSE.txt file.  This error (and many more like it) can be fixed by including the following block in the android section of the same gradle file:

packagingOptions {
        exclude 'LICENSE.txt'
        exclude 'META-INF/DEPENDENCIES.txt'
        exclude 'META-INF/LICENSE.txt'
        exclude 'META-INF/NOTICE.txt'
        exclude 'META-INF/NOTICE'
        exclude 'META-INF/LICENSE'
        exclude 'META-INF/DEPENDENCIES'
        exclude 'META-INF/notice.txt'
        exclude 'META-INF/license.txt'
        exclude 'META-INF/dependencies.txt'
        exclude 'META-INF/LGPL2.1'
    }

 Now we just sync the gradle file and it should be ready to start writing unit tests.

The first test is really simple and mainly to test the unit test setup.  I named it NoteTest.java and it is located under androidTest/java/com/fsk/mynotes/data.

The class inherits off AndroidTestCase and only includes one test for now.  All of the test methods must start with "test" or have the @Test annotation :

package com.fsk.mynotes.data;

import android.test.AndroidTestCase;

/**
 * Test the {@link com.fsk.mynotes.data.Note class}.
 */
public class NoteTest extends AndroidTestCase {

    public void testNote() throws Exception {
        Note note = new Note(-1, null, 0, null);
        assertEquals(0, note.getColor());
        assertEquals(-1, note.getRow());
        assertEquals(null, note.getText());
    }
}

And of course the next step is to run the test.  Here are the steps to create the unit test run configuration in AndroidStudio:

  1. Run->Edit Configurations...
  2. Highlight Android Tests in the left menu
  3. Press the green + button
  4. Give the configuration a name.  In my case I called it "Test All".
  5. Select the module to test (MyNotes)
  6. Select the tests to run.  For this configuration, I want all tests to run.

My ending configuration looks like this:

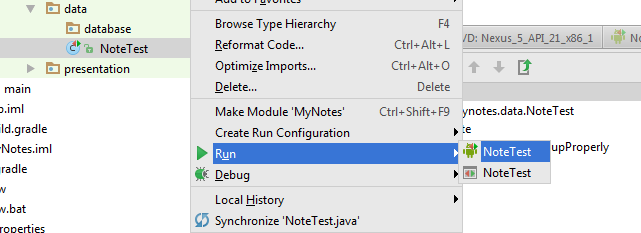
You can also take a shortcut for individual test files:

  1. Select the test in the projects window
  2. Right click
  3. Select either "Run xxxx" or "Debug xxxx"
  4. Select the unit test configuration.  It is the one is the one with the little android icon.


Then just the run the configuration of your choice and watch the test results in the Studio:


Tada, it works!

The commit for the entry is https://github.com/fsk-software/mynotes/commit/f025e582c5dddc06fe9b746d194f52c7ad04d7aa

BTW: Git doesn't like committing empty directories, so I added a ".gitkeep" file into the empty directories for the commit.  The file will be removed later once I actually add content.

Wednesday, December 31, 2014

MyNotes: Migrating to Android Studio

Converting to Android Studio is pretty easy.

The first step is in the migration is open the Android Studio and import the project:


Once the import completes, you will notice that the structure is a little different than eclipse.  Android Studio uses modules instead of projects.  In the case my import, the top-level module is named "app".  I changed this to MyNotes because I like to use library projects and it easier to manage the modules with more descriptive names.

Underneath that the MyNotes module, you will notice that things are organized a bit differently.


The first big difference is that the project consists of modules.  I only have one at this point, MyNotes.  Under that module, the directory structure isn't flat.  By default, the import only creates the main folder.  The normal android project structure all exists under this folder.

Eventually, main will get a sibling folder that will contain the unit tests, but that is another step.

The other big difference is that build tool here is Gradle.  There is definitely a learning curve with Gradle.  Once I got use to it, I learned to appreciate it.  You will notice that there are three gradle files in the project by default: settings.gradle, the project build.gradle, MyNotes module build.gradle.
The settings.gradle and project build.gradle will not change much.  Most changes occur in the modules gradle file.

Which brings us to the first modification to MyNotes gradle file.  Since the oldest build I plan to support is Ice Cream Sandwich, I updated the gradle file to support that as the minimum SDK and to use Lollipop as the target.


Anytime you modify any gradle file be sure to do a gradle sync or a tools->android->sync project with gradle to ensure the changes propagate. The tools->android->sync project with gradle is actually handy to run anytime you get weird build issues.  It doesn't happen very often anymore, but it is a handy trick to know.

Now that everything is compiling again, we can call the migration good.

You can find the commit for these changes here.