There are a lot options for this but I prefer a very simple setup using only junit, mockito, and hamcrest. Robolectric is also a great option and will dramatically speed up the tests. However, I have had issues with it when mocking statics so I tend to stay away from it unless I think the slower speed of running on an emulator will cause problems.
I start my setup by creating a sister folder to my main folder. The new folder is named androidTest and will contain all of my unit tests. Under the androidTest folder, I duplicate the same folder structure as my main folder.

This can be tricky to get working correctly, but the setup that works for me is to add the following lines to the dependencies block:
//Unit test dependencies
androidTestCompile group: 'org.hamcrest', name: 'hamcrest-core', version: '1.3'
androidTestCompile group: 'junit', name: 'junit-dep', version: '4.11'
androidTestCompile("org.mockito:mockito-core:1.9.+") {
exclude group: 'org.hamcrest'
}
This will only include the hamcrest, junit and mockito libraries only when running the unit tests.
The junit and hamcrest inclusion will cause a duplicate file build error due to both libraries including a LICENSE.txt file. This error (and many more like it) can be fixed by including the following block in the android section of the same gradle file:
packagingOptions {
exclude 'LICENSE.txt'
exclude 'META-INF/DEPENDENCIES.txt'
exclude 'META-INF/LICENSE.txt'
exclude 'META-INF/NOTICE.txt'
exclude 'META-INF/NOTICE'
exclude 'META-INF/LICENSE'
exclude 'META-INF/DEPENDENCIES'
exclude 'META-INF/notice.txt'
exclude 'META-INF/license.txt'
exclude 'META-INF/dependencies.txt'
exclude 'META-INF/LGPL2.1'
}
Now we just sync the gradle file and it should be ready to start writing unit tests.
The first test is really simple and mainly to test the unit test setup. I named it NoteTest.java and it is located under androidTest/java/com/fsk/mynotes/data.
The class inherits off AndroidTestCase and only includes one test for now. All of the test methods must start with "test" or have the @Test annotation :
package com.fsk.mynotes.data;

import android.test.AndroidTestCase;

/**
 * Test the {@link com.fsk.mynotes.data.Note class}.
 */
public class NoteTest extends AndroidTestCase {

    public void testNote() throws Exception {
        Note note = new Note(-1, null, 0, null);
        assertEquals(0, note.getColor());
        assertEquals(-1, note.getRow());
        assertEquals(null, note.getText());
    }
}
And of course the next step is to run the test. Here are the steps to create the unit test run configuration in AndroidStudio:
- Run->Edit Configurations...
- Highlight Android Tests in the left menu
- Press the green + button
- Give the configuration a name. In my case I called it "Test All".
- Select the module to test (MyNotes)
- Select the tests to run. For this configuration, I want all tests to run.
My ending configuration looks like this:

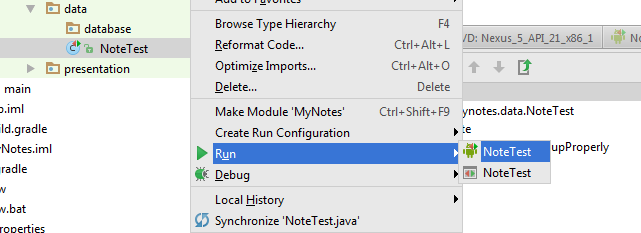
You can also take a shortcut for individual test files:
- Select the test in the projects window
- Right click
- Select either "Run xxxx" or "Debug xxxx"
- Select the unit test configuration. It is the one is the one with the little android icon.
Then just the run the configuration of your choice and watch the test results in the Studio:

Tada, it works!
The commit for the entry is https://github.com/fsk-software/mynotes/commit/f025e582c5dddc06fe9b746d194f52c7ad04d7aa
BTW: Git doesn't like committing empty directories, so I added a ".gitkeep" file into the empty directories for the commit. The file will be removed later once I actually add content.
No comments :
Post a Comment