Recently, Android updated the unit test framework to include Junit4 and mockito. The testing framework now comes in two flavors: Local Tests and Instrumentation Tests. The local tests are true units that do not run on an emulator or device. As a result, everything has to mocked. The instrumentation tests are pretty much the same as the earlier tests: They require an emulator or device and run the full android system.
Android provides a handy write up on the Android Developers site: Building Local Unit Tests
I followed their instructions fairly closely with the big deviation that I brought in PowerMockito as well.
I followed the same pattern in both the MyNotes and CommonLibrary projects. For simplicity, I am only going to detail the changes to one of the projects.
Step 1: Update Gradle
Here are the changes I had to make in order for the new unit test framework to work:
android {
    ...

    defaultConfig {
        ...
        testInstrumentationRunner "android.support.test.runner.AndroidJUnitRunner"
    }
	...
}


dependencies {
	...
    //Unit test dependencies
    testCompile 'junit:junit:4.12'
    testCompile 'org.mockito:mockito-core:1.10.19'
    testCompile 'org.powermock:powermock-module-junit4:1.6.2'
    testCompile 'org.powermock:powermock-api-mockito:1.6.2'

    androidTestCompile 'org.hamcrest:hamcrest-library:1.1'
    androidTestCompile 'com.android.support.test:runner:0.3'
    androidTestCompile 'com.android.support.test:rules:0.3'
    androidTestCompile 'com.android.support.test.espresso:espresso-core:2.2'
    androidTestCompile "com.google.dexmaker:dexmaker:1.2"
    androidTestCompile "com.google.dexmaker:dexmaker-mockito:1.2"
}
Step 2: Create The Local Unit Test Packages
So the instrumentation tests (those that require an emulator) are in the androidTest folder that is a sister to the main folder. The local unit tests get their own folder, test, at the same level as the main folder also:

The “test” folder must contain a folder named “java”. Under the java folder is the basic package layout for the classes that will be tested.
Step 3: Creating a Local Unit Test
@RunWith(PowerMockRunner.class)
@PrepareForTest({LocalBroadcastManager.class, ThreadUtils.class, MyNotesApplication.class, Intent.class,
        NoteFilterBroadcast.class})
public class NoteFilterCacheTest {

    @Mock
    private Context mMockContext;

    @Mock
    private SharedPreferences mMockSharedPreferences;

    @Mock
    private SharedPreferences.Editor mMockSharedEditorPreferences;

    @Mock
    private LocalBroadcastManager mMockLocalBroadcastManager;

    @Mock
    private Intent mMockIntent;

    @Before
    public void prepareForTest() throws Exception {
        when(mMockContext.getSharedPreferences(NoteFilterCache.CACHE_NAME, Context.MODE_PRIVATE))
                .thenReturn(mMockSharedPreferences);

        PowerMockito.mockStatic(LocalBroadcastManager.class);
        when(LocalBroadcastManager.getInstance(mMockContext)).thenReturn(mMockLocalBroadcastManager);

        when(mMockSharedPreferences.edit()).thenReturn(mMockSharedEditorPreferences);
        when(mMockSharedEditorPreferences.clear()).thenReturn(mMockSharedEditorPreferences);
        doNothing().when(mMockSharedEditorPreferences).apply();
        when(mMockSharedEditorPreferences.putBoolean(anyString(), anyBoolean())).thenReturn(mMockSharedEditorPreferences);

        PowerMockito.whenNew(Intent.class).withAnyArguments().thenReturn(mMockIntent);
    }

    /**
     * Test constructor
     */
    @Test
    public void testConstructorFailure() {
        try {
            new NoteFilterCache(null);
            assert false;
        }
        catch (NullPointerException e) {
        }
    }


    /**
     * Tests method {@link NoteFilterCache#isColorEnabled(NoteColor)} and
     * method {@link NoteFilterCache#getEnabledColors()}
     */
    @Test
    public void testRetrievingTheDefaultValuesForEachFilter() {
        NoteFilterCache cache = new NoteFilterCache(mMockContext);

        when(mMockSharedPreferences.getBoolean(anyString(), eq(true))).thenReturn(true);
        Set < NoteColor > actualEnabledColors = cache.getEnabledColors();
        for (NoteColor color : NoteColor.values()) {
            assertThat(cache.isColorEnabled(color), is(true));
            assertThat(actualEnabledColors.contains(color), is(true));
        }
    }


    /**
     * Tests method {@link NoteFilterCache#isColorEnabled(NoteColor)}
     */
    @Test
    public void testCheckingEnabledColorForNullValue() {
        try {
            new NoteFilterCache(mMockContext).isColorEnabled(null);
            assert false;
        }
        catch (NullPointerException e) {
        }
    }


    /**
     * Tests method {@link NoteFilterCache#enableColor(NoteColor,
     * boolean)}.
     */
    @Test
    public void testDisablingEachColor() {
        final NoteFilterCache cache = new NoteFilterCache(mMockContext);

        when(mMockIntent.putExtra(eq(NoteFilterBroadcast.Extras.COLOR), anyInt())).thenReturn(
                mMockIntent);
        when(mMockIntent.putExtra(NoteFilterBroadcast.Extras.ENABLED, false)).thenReturn(
                mMockIntent);

        for (final NoteColor color : NoteColor.values()) {
            cache.enableColor(color, false);
        }

        verify(mMockSharedEditorPreferences,  times(NoteColor.values().length)).putBoolean(
                anyString(), eq(false));
        verify(mMockLocalBroadcastManager, times(NoteColor.values().length)).sendBroadcast((Intent) anyObject());
    }


    /**
     * Tests method {@link NoteFilterCache#enableColor(NoteColor,
     * boolean)}.
     */
    public void testEnablingEachColor() {
        final NoteFilterCache cache = new NoteFilterCache(mMockContext);

        for (final NoteColor color : NoteColor.values()) {
            cache.enableColor(color, true);
            verify(mMockSharedEditorPreferences.putBoolean(color.name(), true));
        }

        verify(mMockLocalBroadcastManager, times(NoteColor.values().length)).sendBroadcast((Intent) anyObject());
    }
}
This is your basic Junit 4 test. The important thing to remember is that you have to mock all Android classes that are called from the unit under test. For most part, this will go smoothly, but there are a few classes that just do not mock well (Point, Rect, etc). This is because the classes use final public attributes instead of accessor methods which make them incredibly hard to mock. Also be warned, that you will have to mock everything from the framework, this includes things some very basic and commonly used classes like TextUtils. Android does provide a way to use default mock values, but I typically don’t use it. If you are interested, just add the following statement to your gradle file:
android {
  // ...
  testOptions {
    unitTests.returnDefaultValues = true
  }
}
The local unit tests work really well for most of the business logic in the app. It does not work well for UI components, the Database, Loaders, Broadcast Receivers, etc. Basically, anything that is highly dependent on an actual Android framework.
Step 4: How to run
- Open the Build Variants tool in the Android Studio (located in the lower left corner:

- From the Test Artifacts menu, select Unit Tests
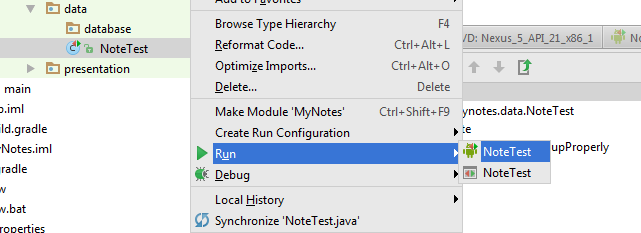
- Navigate to a unit test and do a right-click:

- Select the Run or Debug option of your choice.
- After the tests run, the results are displayed in the junit results:

Instrumentation Tests
These are very similar to the old instrumentation tests. The biggest change is that they are now JUnit4 (Yeah!) and also support Mockito. It will support PowerMockito as well, but you can’t mock any statics (unfortunately). You also have to add a Test Runner to the top of each test:
/**
 * Test the {@link Note class}.
 */
@RunWith(AndroidJUnit4.class)
public class NoteContentValuesTest {
Running these is very similar to the local unit test, except you choose the “Android Instrumentation Tests” in the Build Variant menu:

My Final Note
This is more of an FYI. The Test Artifact selected in the Build Variant are the only ones that will compile and run. So if you are working on Local Unit Tests, make sure to select the correct build variant first so that you can see the syntax issues while you writing the tests. The same goes for the Instrumentation Tests.
It is also important to compile each variant before considering the task complete since compilation issue won’t show up for the unselected variant.
Commits
As always, the commits to support this entry can be found on GitHub at https://github.com/fsk-software/mynotes/commit/ef1dd5389c7783deb05cbacf43c5e5f5628398f6.